|
Throughout this year we have worked with animation, but never before in 3ds Max. I am experienced with animating 2D graphics in the Adobe programs, and I expected it to be harder to animate 3D models since there is an extra dimension to consider. However, 3ds Max makes it incredibly easy. All you have to do it set up your scene, select all, select a new keyframe, then reconfigure your scene, and so on. The program fills in the interpolations smoothly and rigging the animation is extremely easy. All you have to do is move a few things around and change up your objects however you want and that's basically all there is to it.
On the other hand, in the Adobe programs, there was a lot more to it. You had to insert clips, work with all these layer effects, and there were a lot more properties to consider if you wanted to give your animation cool effects. However, 3ds Max is a good 3D modeling program and has animation built into it; Adobe divided their apps into ones that work with creating the graphics and others used to animate. Since 3ds Max has all of it built it, the changes and effects are a lot easier to apply and you don't have to really import a bunch of stuff or do so much work with a timeline. It is very simple and is basically just reconfiguring your scene a couple of times to create your keyframes.
This is a scene I quickly animated.
Conclusion:
1 Comment
Now that my class is done using Adobe Programs, I can officially say that Adobe Animate is my favorite. I also really liked Adobe Illustrator, but Adobe Animate allows you to create a character and then bring it to life by giving it motion. I didn't like Adobe Animate at first because of how difficult the program is to get used to, but creating an original motion graphic is hard work and so you can only expect you would need a complex program to do it in. Personally, I like creating my own original characters/2D graphics and I like the finished product when I animate them. By giving it motion, you're really bringing your character to life and giving it a personality. I also have liked Adobe Photoshop and Adobe Illustrator. I didn't like Adobe Premiere that much because the final products were relatively simple and didn't feel as original. I would rather create my own graphics than to edit videos. Adobe After Effects also had a relatively simple product in the end and just seems to be a simplified version of Adobe Animate. I liked Adobe Photoshop because it allows you to do so much with photo editing and you can still create your own graphics. This is an original graphic I created in Adobe Photoshop. Adobe Illustrator is even better when it comes to creating an original graphic. In Photoshop you can use images from online and add effects to them or put them together with other photos. In my example above, I took an image of smoke and put an image of the "No" sign over it. I then recolored the background, added text, and even used the paintbrush tool to have blood dripping from the "No" sign. However, Illustrator allows you to draw/create your own images and is less so working with photos. The mesh tool and pen tool were two of my personal favorites for this task. 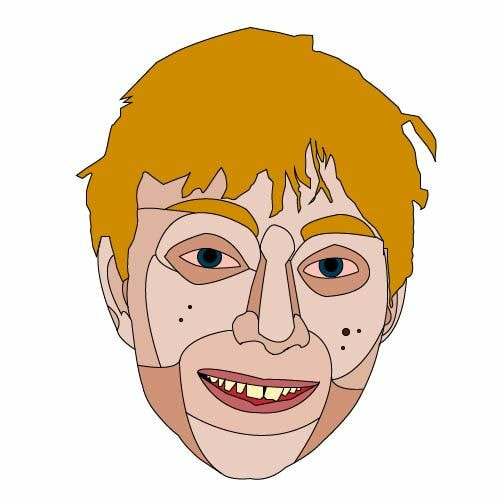 This is an example of an image I created from scratch with the pen tool in Adobe Illustrator. Overall I have really enjoyed this class so far and I have liked working with all of these different Adobe products. They all have different properties and potentials, and can be used for different tasks. It is all a matter of preference. In conclusion:
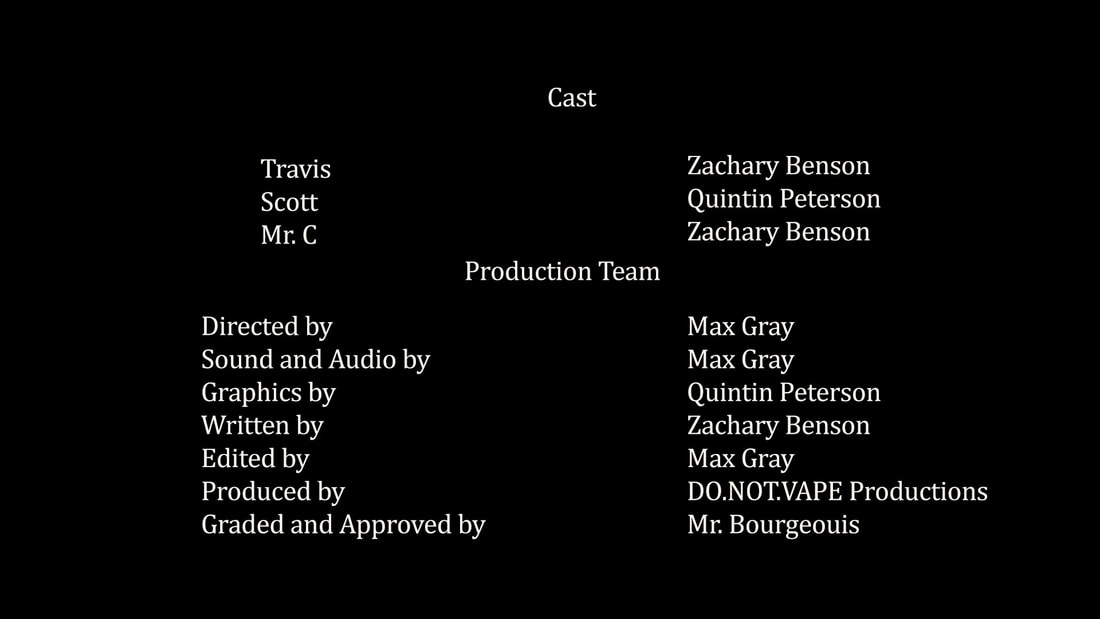
The Video Editing Project was really fun to film and work on with my group-mates, Zach and Max. We chose vaping as our topic because it is a growing issue and it is a big problem at DSA (Durham School of the Arts). Also many people are being fooled into thinking vaping is better than smoking and that it is healthy, when that is not true. Starting off with pre-production, I was in charge of graphics, so I drew 5 hand-drawn sketches of relevant graphic ideas for our final video, 2 of which were logos, and 3 of which were to be put into the final video.
These are my hand-drawn sketches I created for the pre-production stage. For the production stage I was in charge of creating the team logo, the title screen, the credits, and I also made four other graphics that were incorporated into the video that held the information and facts about vaping. I also helped edit and create the script with Zach, and played the role of Scott, who is the main character in the film. He was peer pressured into vaping by his friend, Travis, after ditching class because he was too nervous about a test he didn't study for.
 These are the graphics I created for the production stage of the project. Overall I really enjoyed this assignment and think each of us (my group-mates and me) contributed a lot to the final project. I worked hard on the graphics and chose my colors and composition in order to get across a dark tone and convey that vaping is damaging to your health and is not something to play around with. I tried to have my graphics match what was going on in the video and being talked about. Conclusion
Citations for our research: “Vaping: What You Need to Know (for Teens).” Edited by Hillary B. Gordon, KidsHealth, The Nemours Foundation, Feb. 2019, kidshealth.org/en/teens/e-cigarettes.html. Posted byJeffrey BuckleyI was a smoker for over 25 years. In this time I also earned my medical degree with a specialization in addiction treatment and counseling. That period has led me to vaping. “Side Effects of Vaping: New Studies and Researches Explained.” Vaping Daily, vapingdaily.com/what-is-vaping/vaping-side-effects/. Wootton-Greener, Julie. “Teenage Vaping: E-Cigarettes Are No. 1 Cause of School Suspensions.” Twin Falls Times-News, 20 Oct. 2018, magicvalley.com/news/local/education/teenage-vaping-e-cigarettes-are-no-cause-of-school-suspensions/article_12a5a201-af07-5262-bd64-e0d29b37715d.html.
Recently my class has been learning about animation, and as difficult and exhausting as it is, it is so amazing to see what you've created. The sense of satisfaction you get after actually making your character come to life is insane. It makes the tedious and hard work feel worth it.
My favorite animation so far was creating the motion graphic created in Adobe After Effects, which was really easy to get familiar with and really fun to use. The timeline was easy to work with and so were the different techniques such as changing the opacity and moving lines around. However it does have limitations in the end result and you cant make a character as easily or more complex movements. On the other hand, Adobe Animate was very frustrating to use, but the final product was a lot more real and complex. It took ten times more time and I definitely feel like it's hard for beginners, but with more practice it could be really great to use. Seeing my monster that we animated coming to life was insane and a lot cooler than my motion graphic, but required a lot of works and the techniques used took a lot more time. Finally was working with traditional animation mainly in Adobe Illustrator. This was a very primitive and particularly tedious way of animation and is very similar to how it used to be done. We worked with his for the ball animation and took the most time, just to make a super simple animation that I could make in 10 minutes on any other software. It goes to show how far our technology has come and how much more is available to us to make animation more efficient.
Summary:
References:
“Traditional Animation.” Wikipedia, Wikimedia Foundation, 27 Jan. 2019, en.wikipedia.org/wiki/Traditional_animation. “How to Make Motion Graphics in 4 Simple Steps.” Column Five, 20 Oct. 2018, www.columnfivemedia.com/how-to-create-engaging-motion-graphics-in-four-steps.
An idle animation is the movement of your character while they are standing still and they typically occur while the player is inactive. Although it's such a minor detail that you often don't pay keen attention too, it builds character and even the feel of the game without you even realizing its tremendous influence. In the Gamasutra article, "What makes a great idle animation? Devs share their favorites", numerous fan favorite idle animations are presented, and each one shows how idle animations contribute to the game, and overall shows the thought process and cleverness behind these animations.
My favorite out of the animations would definitely be from Earthworm Jim. It presents a rather humorous and imaginative/inventive pose in a dark and chilling setting. In the background, dark undertones are used and lightning is striking too, contributing to a more formidable atmosphere. However, the creativity in having Earthworm Jim remove his body from his suit and use it as a jump-rope and the funny nature of the whole idea reaffirms the more zany theme/presence of the game. Even behind the absurdity of it, it has a more natural presence, based on how his suit and his body are two separate pieces, and given the fact worms are the shape of jump-ropes, overall presenting itself as possible. He is a worm after all... Overall idle animations are very important in contributing to the atmosphere of a game, and although subtle, they play an important role in building the character and the feel of a game.
References:
Couture, Joel. “What Makes a Great Idle Animation? Devs Share Their Favorites.” Gamasutra: The Art & Business of Making Games, gamasutra.com/view/news/318163/What_makes_a_great_idle_animation_Devs_share_their_favorites.php. “Earthworm Jim.” Wikipedia, Wikimedia Foundation, 10 Feb. 2019, en.wikipedia.org/wiki/Earthworm_Jim. Giphy. “Animated GIF - Find & Share on GIPHY.” GIPHY, GIPHY, giphy.com/gifs/8hYyqFzmWzSSIRwJZb.
In conclusion:
Stop Motion Animation is a relatively simplistic and convenient form of animation, where a real-life object is moved in small increments and a photograph is taken of each one, which are all then played in a fast sequence that appears as motion. This is a very primitive form of animation and anyone, that puts in enough time, could do this. It doesn't require advanced technology or software either and allows you to use real-life elements to create it. For example, you could show your LEGOs fighting without your hand moving them. The only tools required for Stop Motion Animation are a camera, props, and software that can display the photos you took in rapid succession. An example of software you could use is Stop Motion Pro Eclipse. People also use lights, a green screen for the background, and/or a tripod to stabilize your camera. Some techniques used are to change the pace/speed of what happens and to vary your camera angle. It is important to change things up and have variation. For example, if your character is running, they wouldn't be going at the same speed as someone walking. Changing the camera's perspective/view also helps, so you can focus/hone in on a specific part of the scene. I chose Stop Motion Animation because anyone could do it and it helps you understand the basic concept of animation. It interests me because you see real-life objects appear to be moving. I have already learned how to make images and create them into a scene, as well as how to time manage. This skill set could help me with animation by allowing me to create the images for the scene and time management is important because animation requires a lot of patience/work and you need to work efficiently. In conclusion:
References;
“..” The Popsicle Stick Ballista, www.stormthecastle.com/stop-motion-animation/Nine-creative-techniques-for-stop-motion-animation.htm. “6 Best Stop Motion Animation Software to Use on Windows PCs.” Windows Report - Windows 10 and Microsoft News, How-to Tips, 19 Dec. 2018, windowsreport.com/stop-motion-animation-software/. Study.com, Study.com, study.com/academy/lesson/what-is-stop-motion-animation-definition-techniques.html. |
AuthorMy name is Quinn Peterson! I will be reflecting about my art work in this blog! Archives
May 2022
Categories
All
|


 RSS Feed
