|
After revisiting some skills I learned last year in Photoshop in my last blog post, I decided to go more in depth with those skills as well as learn some new ones in the process of designing a character. I did this in the Character Development class at the A.I.M. summer camp in NCCU. Not only did I have a teacher to teach me new techniques and guide me throughout the way, but the camp also supplied everyone with a Wacom Intuos Pro and I got my first experience with using a Wacom tablet and drawing digitally. In this post I'll walk through my process in designing my character, Gabe Petey.  To start, I planned out my characters background and all of his characteristics, creating a mental picture of what I wanted him to look like in my head and on paper. I then began designing, using the symmetry tool to create a line of vertical symmetry through my template so I could begin sketching my character and maintain facial symmetry so my character does not look distorted and looks as realistic as possible. After creating my outline using small strokes, I began to fill my character in with color, using the paintbucket tool, to get the colors I wanted in place. After filling in the color, I decided to begin shading and creating depth. For this I increased my brush's diameter and created a shortcut for the blend/eyedropper tool. I then added in simple strokes and blended them in consecutively until the shading looked smooth and neat. After shading my character in, I added in a background using the same brush settings to easily create clouds and the sun. Eventually I began adding more details into my character, such as drawing in more discrete facial hairs and freckles to add more realism to my character. 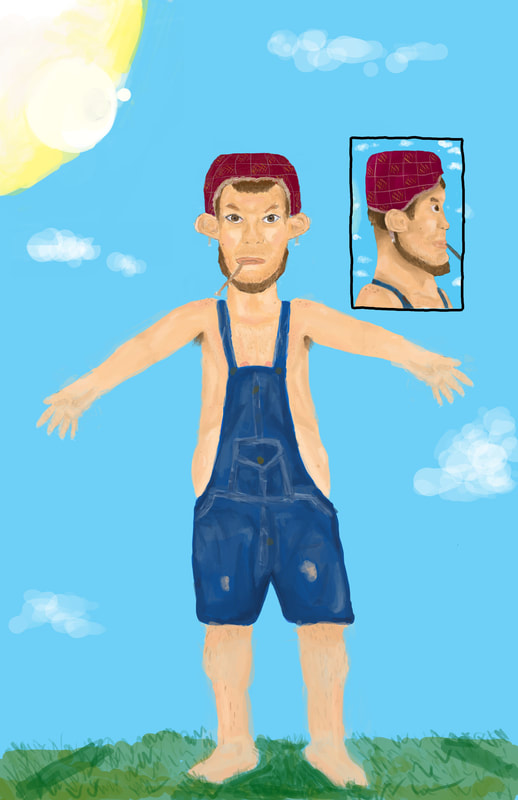 As seen in the image above I then worked on creating a full body and a preview for a side view. To create the side view I implemented the ruler tool on to my original front view and used the lines it created in a new layer to figure out the positions of all the facial features for my side-view. From there I used the same process as I did to create the front view. Finally, I began working on the body in the form of an A-Pose. I again used the same process for the skin tone, but the denim was tricky. First I used 'Place Embedded" to add in an image of denim. I then used the eyedropper tool to sample colors and the shading from that image and implemented it into my own, using that to create seams and folds in the jacket to create the texture. From there I was done and began touching up minor details. Overall I got some experience with the Wacom tablet, as well as learned some new tools and methods to help with shading and creating different views/angles of a person, as well as got to work with the process of character development and design. In a nutshell:
References: “Women Clothing Blue Jeans Denim Overalls.” Amazon, Amazon, www.amazon.com/Women-Clothing-Jeans-Denim-Overalls/dp/B071HVYCX9. “Wacom Intuos Pro: Creative Pen Tablet.” Wacom, www.wacom.com/en-gb/products/pen-tablets/wacom-intuos-pro.
0 Comments
|
AuthorMy name is Quinn Peterson! I will be reflecting about my art work in this blog! Archives
May 2022
Categories
All
|
 RSS Feed
